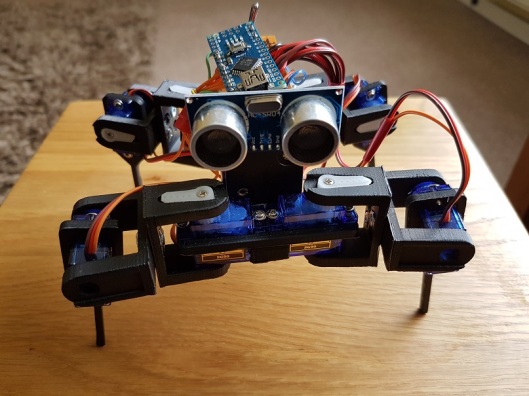
 I decided to have a go at building a robot for a STEM session last weekend, to show the power of code and how it can be used to control something. A moving robot is a great visualisation to demonstrate this.
After some searching I settled on a quadruped shown on thingverse (a 3d printing site). This is a build based on a robot called Chopstick Junior by Lumi.
Parts being printed, I set about thinking about the controls and motors. The parts are compatible with an SG90 servo. I needed 8 of these, for the knee and hip joints of the quadruped.
The assembly of the parts was a bit of a challenge as in the instructions it said you needed 3mm x 6mm screw/nuts to connect the shoulders together. You really need 3mm x 8mm screw/nuts as I have to countersink the holes a bit more to get the nuts to attach to the 6mm screw length.
Inserting the servos into the holes in the hips and legs required the unscrewing of the 4 small screws in each servo and temporarily removing the gear top. Once inserted this can be replaced and screwed down.
Once the servos were in place I centered the servos the best I could to allow backwards and forwards movement in each joint. I knew that later adjustment may be needed! This can easily be achieved removing the servo arm and hip/leg, then re-positioning and attaching the arm again.
The power is provided by 4 x AA batteries in a square battery holder. This was glued down onto the frame and fitted well into the build.
The power bus is provided by a small piece of circuit board. I used two lines for -v and +v. Each servo was then wired into the lines and the control wire to an Arduino Nano which is used as the brains of the robot.
The following pins were used on the Digital I/O on the Arduino Nano:
- D2 – Hip 1
- D3 – Knee1
- D4 – Hip 2
- D5 – Knee 2
- D6 – Hip 3
- D7 – Knee 3
- D8 – Hip 4
- D9 – Knee 4
I also wired in a sensor on the front of the robot to D10 and D11.
Wiring is grouped together to allow movement, but cut to a length that reduces excess that could get in the way of the legs.
A toggle switch provides an on/off for the power fixed to the rear of the robot. Remember to break the lines on the circuit board so it does not join any of the lines.
Once assembled I then got round to coding. I decided to use the opensource code for the Chopstick Junior as a base and make alterations. The quadruped responded well to the code and several physical servo adjustments were needed. Its now in a reasonable state, however balance is an issue in terms of walking steadily, so need to work more on this. I have not yet coded movement to respond to the sensors yet, this will be done later.
The code is available via my Github: https://github.com/Cloudmage/Robots
The robot went down well at the STEM session. Now to tweek that code……
Top view

Side View

Front View

 Today I got a challenge from Lewis Richards (@Stroker on Twitter) – A selfie with a Raspberry PI Laptop that I have built. Okay – Challenge accepted.
 The options available to consume voice activated assistants are increasing with recent releases within the market.
 I decided to have a go at building a robot for a STEM session last weekend, to show the power of code and how it can be used to control something. A moving robot is a great visualisation to demonstrate this.


 Raspberry Pi have released a desktop/Laptop version of their
  Searching round on the crowdfunding sites for things that are coming, I found the VoCore2 on iniegogo.


 docker 1.9.1


 There are lots of Automation tools available to people and businesses today to automate tasks that are carried out in a manual way. The pace at which this is happening is varying based on


